Supabase API keys: anon vs service_role, and which one is safe for the browser
Who this is forAnyone stuck on which Supabase key to paste into AI-generated code, who wants to know which keys are safe to expose.
TL;DR: When you create a Supabase project, you get several keys. They fall into two kinds. One is safe to expose in the browser if you have turned on row-level locking rules (RLS). The other passes through those rules entirely. This article shows how to tell the two apart, and how to check with your own eyes that the lock is really on. The most common mistake is to stop at “I got no error, so it’s fine.”
Contents
- Putting the key into AI-generated code
- Four keys, but only two types
- Step 1. Sign up and create a project
- Step 2. Get to the API keys in Settings
- Step 3. When you need the old key names
- Step 4. How to verify the lock actually works
- Think twice before opening the rules
Putting the key into AI-generated code
If you ask AI to “save this to a database,” it will usually wire in Supabase. So far, so good. The trouble comes after that.
Once you create a project and open the settings screen, several keys show up. The code the AI gave you has only one SUPABASE_KEY slot, and nobody tells you which one to use.
So most people do this: they try one and use whichever works. And it works. That’s the problem.
Four keys, but only two types
| Key name | Type | OK to put in the browser? |
|---|---|---|
publishable |
public (new name) | Yes, if RLS is enabled |
anon |
public (old name) | Yes, if RLS is enabled |
secret |
master (new name) | Never |
service_role |
master (old name) | Never |
Supabase is renaming its keys, which is why there seem to be four. There are only two types.
Here’s an analogy that helps.
- A public key is a building’s lobby key card. It gets you into the lobby. Which rooms you can open from there is decided by a separate set of rules. Those rules are the RLS I mentioned earlier.
- A master key ignores all the rules and opens every room.
Public key (publishable, anon)
- Where it lives Browser, app code It's fine if it shows up in the page source
- Permissions Only what the rules allow A lobby key card that only gets you into the lobby
- Prerequisite RLS must be turned on Without it, everything is open
Only safe when the rules are in place
Master key (secret, service_role)
- Where it lives Server, secret storage Somewhere like GitHub Actions secrets
- Permissions Everything A master key that opens every room
- Prerequisite Passes through even with RLS The rules can't stop it
Put it in the browser and all the data is exposed
Step 1. Sign up and create a project
- Click Start your project at supabase.com.
- Signing in with your GitHub account is the quickest way. Email works too.
- If it’s your first time, it will ask you to create an organization. The organization comes before the project. The name can be anything, and you can change it later.
- Inside the organization, click New project.
Three things get asked when you create the project.
| Item | What to enter |
|---|---|
| Name | You can change it later. Anything works |
| Region | If you’re using it from Korea, choose Seoul (the South Korea region). Responses are noticeably faster |
| Database password | This screen won’t show it again after you leave. Write it down now |
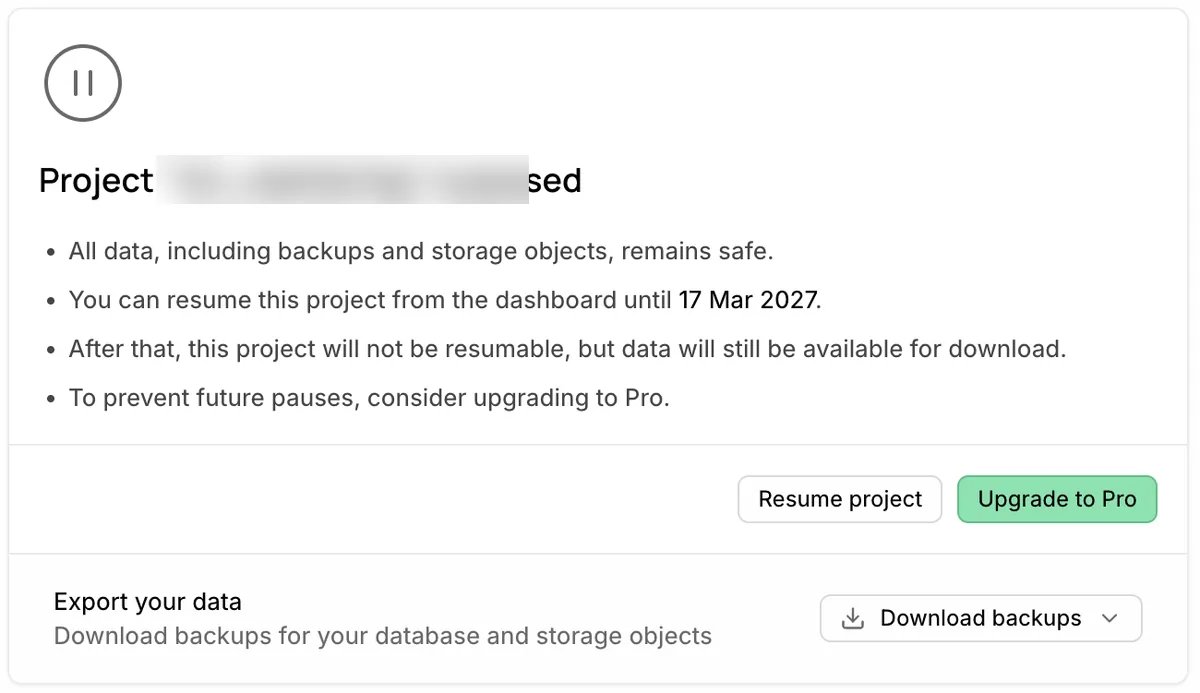
After you create it, wait a few minutes. If you go looking for the keys in the meantime and see “not yet,” that’s normal and not a bug.
Step 2. Get to the API keys in Settings
This is the step where first-timers lose the most time. You know the keys are somewhere, but you can’t find that somewhere.
- Click the gear icon at the very bottom of the vertical icon bar on the left of the project screen. This is Settings.
- In the menu that opens on the left, click API Keys.
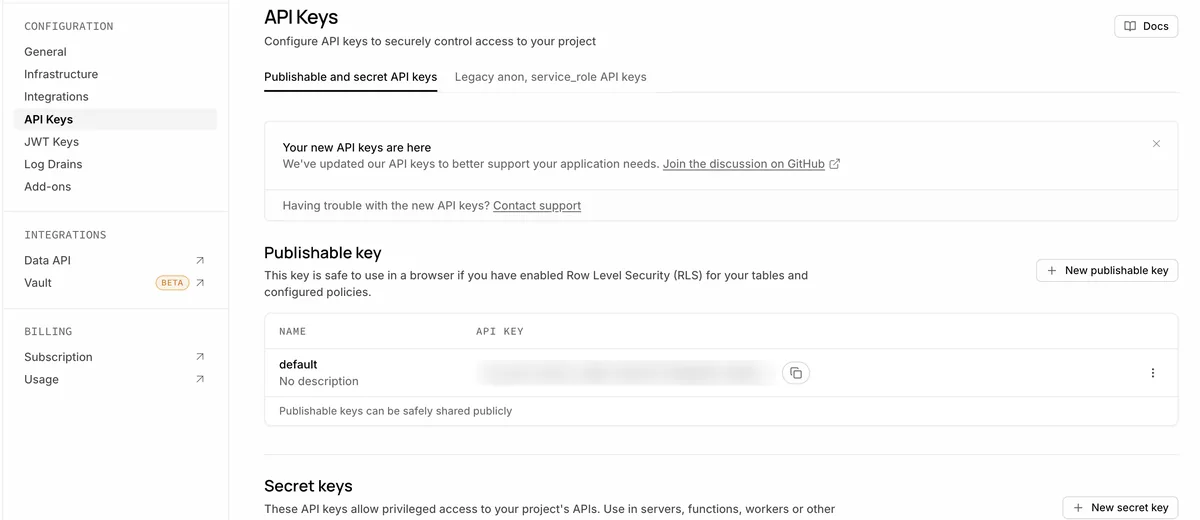
The English sentences on screen actually give the whole answer.
| Text on screen | Meaning |
|---|---|
| Publishable keys can be safely shared publicly | You can make this key public |
| This key is safe to use in a browser if you have enabled RLS | If you’ve turned on RLS, you can put it in the browser |
| These API keys allow privileged access | This key grants privileged access. Keep it on the server only |
Step 3. When you need the old key names
If the sample code or example you’re following uses the names anon and service_role, look for them in the Legacy anon, service_role API keys tab on the same screen.
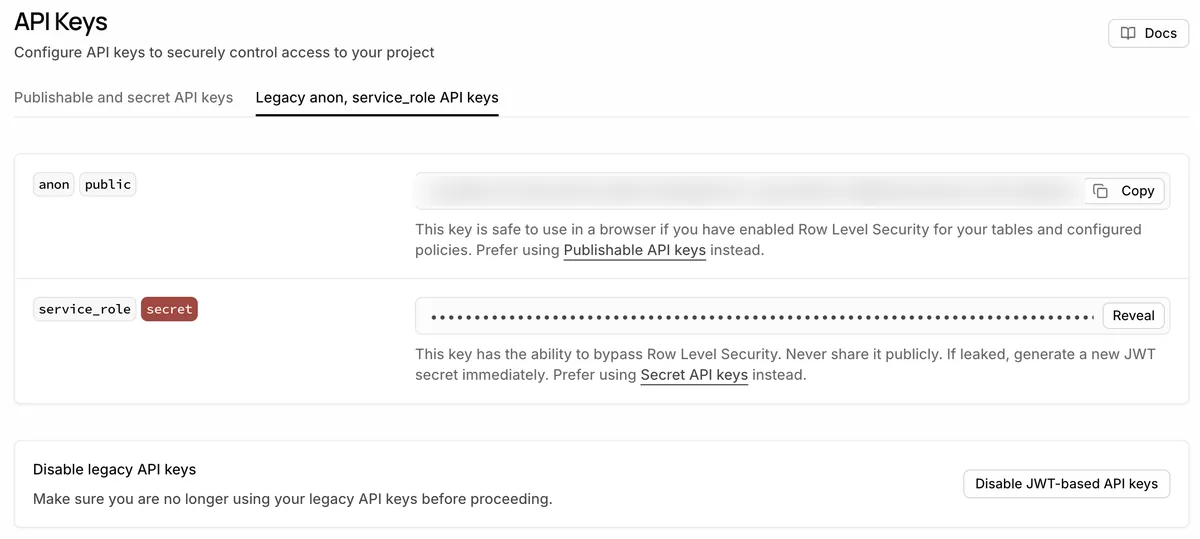
Here’s what the explanatory text on this screen says.
| Key | What the screen says |
|---|---|
anon (public) |
Safe in the browser if RLS is enabled. Going forward, it recommends using the Publishable key |
service_role (secret) |
Can bypass RLS. Never expose it. If it leaks, it tells you to generate a new one immediately |
Only the names changed; the roles are the same. Just follow the name your code asks for.
Step 4. How to verify the lock actually works
This is the most important part of this article.
When you turn on the lock (RLS) for a table, it looks locked. But you have to check directly whether it’s really locked, because a blocked request doesn’t return an error.
Here are the results of turning on the lock for a table holding 600 articles and querying the same data three ways. The policy was set to “only logged-in users can read,” and I didn’t give unauthenticated access any policy.
| Key and state used for the query | Response | Rows visible |
|---|---|---|
Master key (service_role) |
OK | 600 |
Public key (anon), not logged in |
OK | 0 |
Public key (anon), logged in |
OK | 600 |
A query without login doesn’t return a “permission denied” error. It returns a normal result with 0 rows.
This is a problem because on screen, the two situations look identical:
- The lock is working, so there are 0 rows.
- The data just isn’t there, so there are 0 rows.
In short, compare the count you see with the master key against the count you see with the public key while logged out. You need to see 600 turn into 0 with your own eyes before you can say it’s locked. “No error, so it’s fine” is not verification.
Turning on the lock itself is a one-time step per table. The procedure is in Supabase’s documentation under Row Level Security. This article covers how to check that it really turned on after you’ve enabled it.
Think twice before opening the rules
If you keep the lock on, nothing works. So when you tell AI “it’s broken, fix it,” it will open the rules for you. That will work. But you need to look at what you opened.
While building a time-off request screen (annual paid leave, a standard employee benefit in Korea), if you also want to add approval, you have to give the public key write permission. Then this happens:
And the public key is sitting right there in the browser source. That means the moment you put the page online, anyone can press the approve button.
The answer is to make the rules more precise. If that’s too hard, don’t put it on the internet. A tool you use only on your own computer is still plenty useful.
The screens and key names in this article were checked on August 24, 2026. Supabase has changed key names and screen layouts before, and its pricing terms change too. If the actual screen looks different, go by the English description on Settings > API Keys. That text is always the most current.
Frequently asked questions
- Is the Supabase anon or publishable key safe to use in a browser?
- Yes, but only if row-level security (RLS) is turned on. Without RLS, everything is open. The secret and service_role keys must never be exposed.
- How do I check that RLS is really blocking an anon key request?
- Query the table with the anon key while logged out. A blocked request returns no error, only 0 rows. The dashboard table editor uses the master key, so it cannot confirm the lock.
Want the full system? The Claude Code & Codex Skills guidebook collects the skills and subagents behind this blog, from $19.
BuildnWrite helps teams build AI agents that keep running. About BuildnWrite ›