Aside Browser How to Use: Connect Subscriptions and Install the CLI
Who this is forOffice workers who have heard of Aside or just installed it and don't know whether they need to pay more or what to hand off first.
TL;DR: Aside is an AI browser that lets you use the Claude or ChatGPT subscription you already pay for. This post shows where to connect a subscription and how to install the CLI, using real settings screens. It also covers three tasks I handed off and where I got stuck after more than a month of use. It fits people who already have an AI subscription and want to hand off web tasks that require logging in.
Contents
- What Aside does
- Connecting subscriptions you already have
- Install the CLI and call it from the terminal
- First tasks to hand off
- Where I got stuck over a month
- Checking that it all works
After installing Aside, two questions come up: do I have to pay more, and what should I ask it to do first? I have been using Aside since late August 2026, and I used it every day for more than three weeks, through mid-September. This post covers two setup steps to do right after installing, and spends most of its length on the tasks I actually handed off and where I got stuck. I checked the screens and official docs on October 2, 2026.
1. What Aside does
Aside is a product with an AI agent built into the browser. The AI opens, reads, and clicks the sites I’m logged in to, in exactly the state they are in. Once, on Threads, I wrote this:
In one line: it moves the web tasks I do by hand onto an AI’s hands.
(Threads post by @buildnwrite, September 19, 2026)
If you want to learn more about the concept, read these two posts first. This post only covers setup and my usage notes.
- What an agent browser is: What is Aside?
- How it differs from Chrome extensions and app-based computer use: Six AI browser and computer-use tools compared
You get the installer from the official download page. The two official sources describe supported platforms differently.
| Official source | What it says (October 2, 2026) |
|---|---|
| Download page | Introduced as an AI browser for macOS and Windows |
| Get-started doc | Supported environment: macOS 15.0 or later |
I checked every screen in this post on macOS.
2. Connecting subscriptions you already have
When I posted about Aside on Threads, people asked, “Do you pay for it?” There are three ways to use AI models in Aside, and the official docs call these provider types.
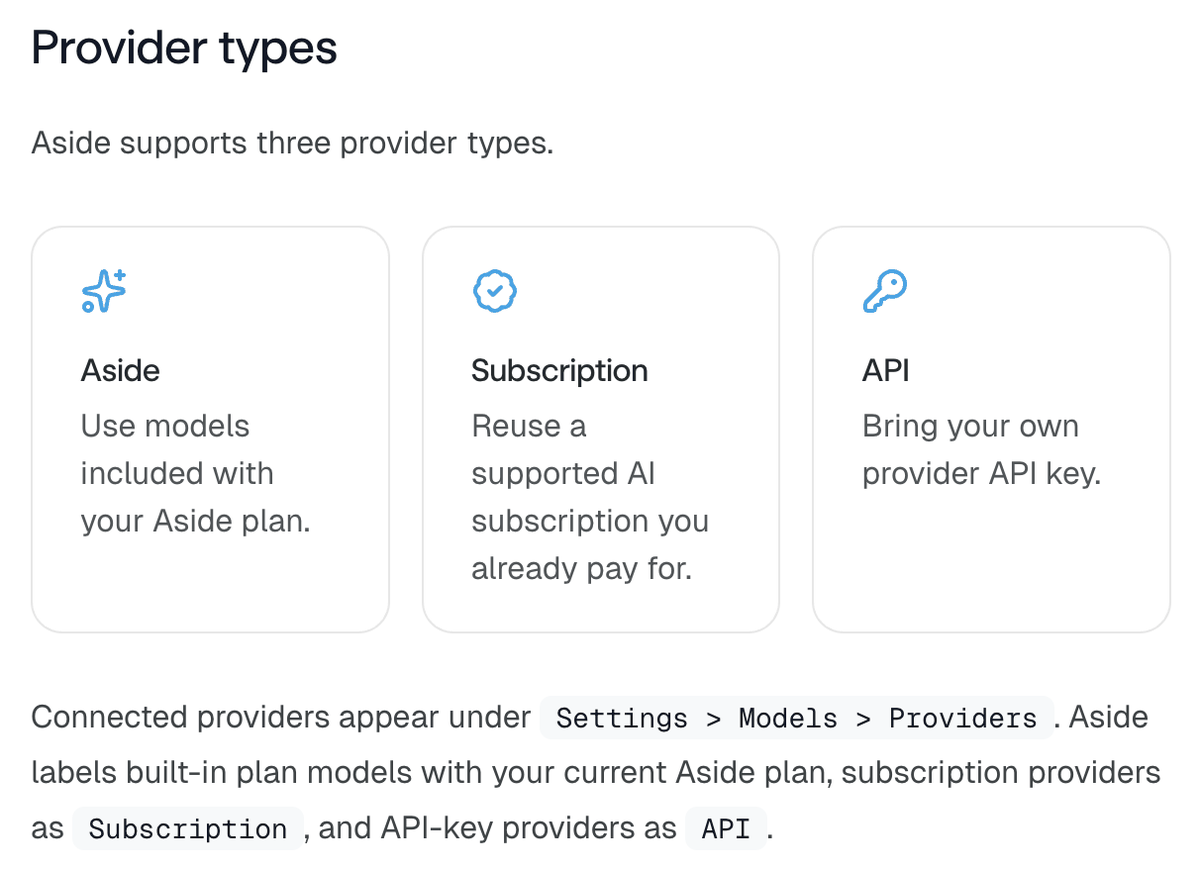
| Type | What you use | Relation to Aside credits |
|---|---|---|
| Aside | Models included in the Aside plan | Uses credits (Free gets 500 a month) |
| Subscription | ChatGPT Plus, Pro / Claude Pro, Max / GitHub Copilot | Separate from credits |
| API | An API key you issue yourself | Separate from credits; the provider may bill you |
I checked the values in the table against the provider docs and the plan docs. The plan docs say credits are separate from any external AI subscription you connect.
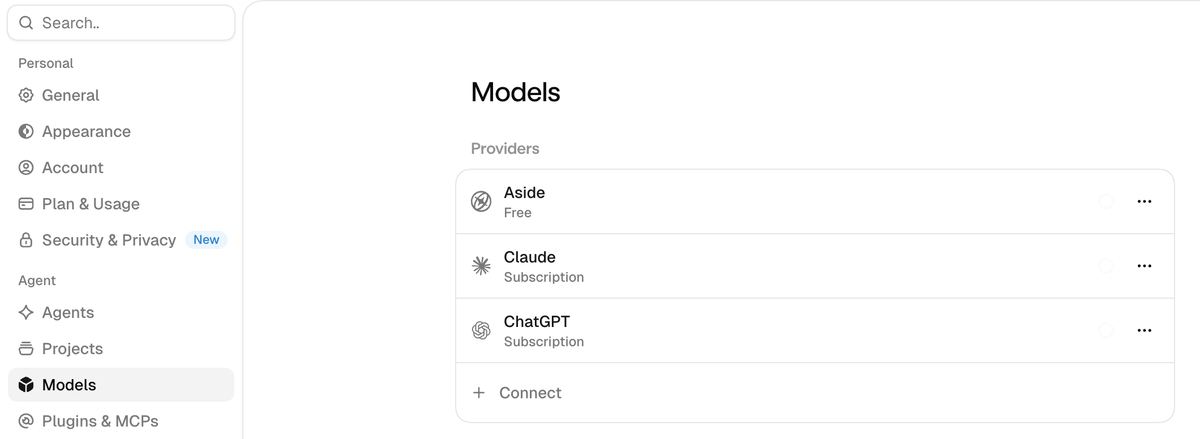
First, you need an Aside account. The get-started doc says you need one, and the first launch starts with sign-up or login. The connection steps are as follows:
- Open Aside settings and click Models in the left menu.
- Click Connect at the bottom of the Providers section.
- Under Subscription, pick the subscription you use (Claude, ChatGPT, or GitHub Copilot).
- When the login window appears, log in with that subscription account and return to Aside.
Aside has three plans: Free, Pro, and Max. The docs say Free includes 500 credits and 3 routines a month, Pro gives 3 times the Free usage, and Max gives 30 times, but they do not list prices. You can see your plan and remaining credits under Settings > Plan & Usage. Terms can change on the service’s side, so check that screen yourself before paying.
3. Install the CLI and call it from the terminal
Once you connect a subscription, you hand off tasks right inside the Aside window. The CLI is the next step. Once installed, you can call Aside from the terminal or from other AI tools such as Claude Code.
There are two install methods, and both produce the same result. If the terminal feels unfamiliar, you can install just by pressing a button in the settings screen. The developer docs also say you can install or reinstall the CLI right from the developer settings screen.
- From the settings screen: click the install button in the Aside CLI section under Settings > Developers.
- From the terminal: paste the one line below and press Enter (macOS, per the same doc).
curl -fsSL https://releases.aside.com/install.sh | bash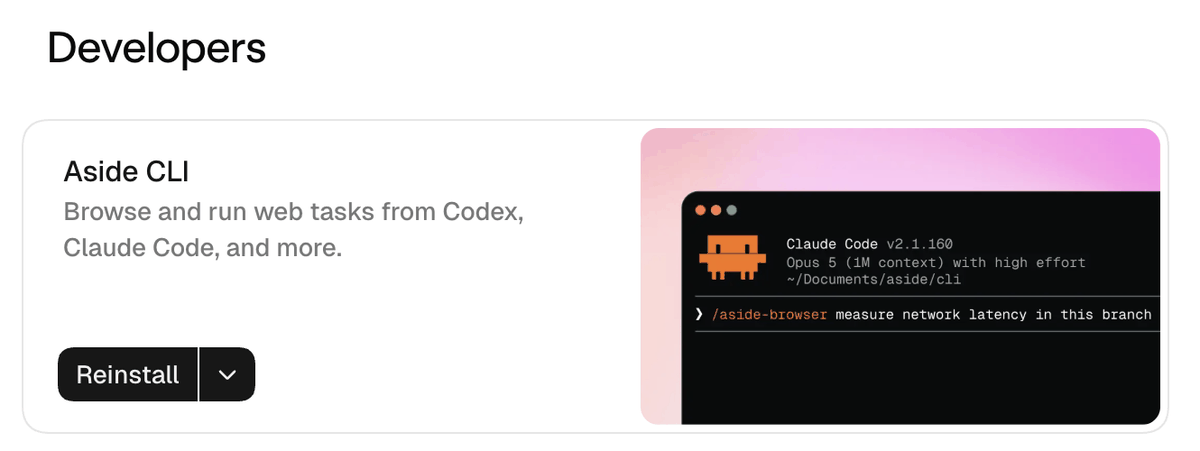
For Windows, the same doc has a separate procedure: verify the installer’s signature in PowerShell, then run it. The doc says that on Windows, if aside isn’t recognized right after installing, you should open a new terminal.
Once installed, type aside in the terminal and put the task in quotes. The example below ran on October 2, 2026. I picked a read-only task.
aside "buildnwrite.com/blog 을 열고 가장 최근 글 3개의 제목만 알려줘. 다른 사이트는 열지 말고, 아무것도 누르거나 입력하지 마."buildnwrite.com/blog의 최근 글 3개 제목이에요(최신순).
1. OpenAI dots 사용법과 첫날 사용기: 그록 봇, 메타 뮤즈 비교 (2026년 10월 1일)
2. 제미나이 할인 요금제 고르기: 가벼운 사용은 Plus 월 7,500원 (2026년 9월 28일)
3. AI 에이전트 도입, 혼자 해볼 일과 코칭이 필요한 일을 가르는 질문 3개 (2026년 9월 23일)
블로그 페이지 하나만 열어서 읽기만 했고, 아무것도 누르거나 입력하지 않았어요.The Skill & MCP section on the same Developers screen holds the settings for connecting Aside to other AI tools. MCP is a connection method AI tools use to call each other. The screen’s description reads: “Let agents work with Aside through the CLI and skills.”
4. First tasks to hand off
For your first task, pick something a person used to do by hand on a screen that opens only after login. These are the three tasks I actually handed off.
| Task I handed off | Why I did it by hand | What the AI did | What I did |
|---|---|---|---|
| Editing the Wikidocs (a Korean book-publishing and wiki platform) book description | The book description is read-only through the API | Opened the edit page, entered the manuscript, saved | One line of instructions |
| Issuing three documents for the EV subsidy | Government24 (South Korea’s government services portal) civil-service pages | Applied for the three documents, saved the issued pages as PDFs | Logged in with simple authentication (Korea’s app-based ID check) |
| Replacing the LinkedIn profile summary | A screen that requires login | Replaced the summary while staying logged in within Aside | Instructions |
Wikidocs book description. I keep the book manuscript as files that Claude manages, but the book description page could not be written through an API. So I gave Aside this instruction:
편집 페이지 열고 에디터에 이 원고 넣고 저장 눌러Now, when I edit the manuscript, the book description updates too.
EV subsidy documents. I needed three documents: an abridged resident record (chobon), a full resident registration record (deungbon), and a local tax payment certificate (proof that local taxes are fully paid). The steps were:
- Log in to Government24 with simple authentication (me)
- Apply for the three documents (Aside)
- Save the issued documents as PDFs from the issuance screen (Aside)
- Rename the files and bundle them into one zip (Claude Code)
I handled only the identity verification. Aside did the screen work, and Claude Code organized the files.
LinkedIn profile. Since I used the session that was already logged in to Aside, I finished replacing the summary without any new authentication step. I also recorded this in What is Aside?.
The more specific the instruction, the better the result. The task docs say to state the desired outcome and the site or file to use, and they give “handle the payment for me” as an example of an instruction that is too vague. Write down three things:
- Which site and which account
- What result you want (a file, a summary, a saved state)
- What it must not do (payments, sending, deleting)
You set the file access scope per task with a permission mode. This follows the permissions doc.
| Mode | File access scope |
|---|---|
| Read only | Only views the browser and file contents; no file changes |
| Guard (default) | Works inside folders you approve; asks before accessing other folders |
| Full access | Read and write across the whole computer |
The same doc says saved password values are not visible to the AI agent. This is a design the company describes, not the result of a third-party security audit.
5. Where I got stuck over a month
In September 2026, after more than three weeks of daily use, I wrote down three things that did not work. The one you hit even without using the terminal is login.
Login is separate from Chrome. Even when I was logged in to Chrome, I had to log in again in Aside. Aside is a separate browser from Chrome. Once you log in once in Aside, you use that state from then on. The get-started doc has a setup step that imports history, cookies, and bookmarks from another browser on first run. Still, before handing off a task, it is safer to check in this order:
- Open the site you want to hand off directly in the Aside window.
- If a login screen appears, log in yourself.
- Hand off the task only after you see that you’re logged in.
The other two are limits I ran into when controlling Aside directly with code from the terminal.
| Snag | In plain terms | When it comes up |
|---|---|---|
| Limit on where screenshots are saved | AI-captured screens are saved only to the set work folder; you copy them out yourself | When you want to receive a screen as a file |
| Some commands missing | Among the commands used when controlling it with code (REPL), page open, click, capture, and PDF exist. Keyboard, mouse, and window-size commands do not | When you want fine-grained control with code |
When I took the screenshots for this post on October 2, 2026, captures were still saved inside the work folder. The rest are September notes, so they may have changed since.
I ran into two more things when calling it from the terminal.
- Unless you specify otherwise, each call starts a new task. To continue, specify the previous session with
--session, likeaside --session <session ID> "continue here"(developer docs). - If the connection drops, reopen the Aside app before handing off the next task.
Where the company and product are headed is covered separately in Could Aside Become the Next Cursor?
6. Checking that it all works
Next, look for candidates in your own work. The test is simple: is it a task with no integration, where a person opens a screen and repeatedly clicks through the same steps?
When bringing it into team work, decide a few things before the tool:
- Which single task to start with, and what counts as done
- Which accounts and folders to open up
- Where a person must check manually, such as payments or sending
The judgment that “this task can’t be automated because there’s no integration” changes with tools like Aside. But the team that knows the work still has to decide what to hand off and how far.
Frequently asked questions
- Do I have to pay to use the Aside browser?
- The official docs list 500 credits and 3 routines a month on the Free plan. You can also connect ChatGPT Plus or Pro, Claude Pro or Max, or GitHub Copilot under Settings > Models > Providers. I use Claude Max on the Free plan. Terms can change, so check Settings > Plan & Usage.
- Does Aside work on Windows?
- The download page calls Aside an AI browser for macOS and Windows, while the get-started doc lists only macOS 15.0 or later (both checked October 2, 2026). Windows users should confirm the installer downloads.
- If I'm logged in to Chrome, am I also logged in to Aside?
- Assume they are separate. I had to log in again in Aside even while logged into Chrome (September 2026). Setup can import another browser's history, cookies, and bookmarks. Before handing off a task, open the site in the Aside window to confirm you are logged in.
BuildnWrite helps teams build AI agents that keep running. About BuildnWrite ›