Adding Login to a Vibe-Coded App with Supabase: Sign-Up, Google, Magic Link
Who this is forVibe coders who have built the screens with AI but have not yet decided how to add login.
TL;DR: When you ask AI to build a service, a login screen comes along with it, but making that screen actually work is a different job. There are three main ways to add login to a service built with vibe coding: permanent sign-up with email and password, social login that borrows a Google account, and magic links that sign users in through an emailed link with no password. With Supabase, each one takes a function or two, but the places where you get stuck are all different. This post starts with a flowchart to help you pick one, then covers the implementation and pros and cons of each, plus the email send limit that two of the three run into.
Contents
- Which method to pick
- Permanent sign-up: email and password
- Google login: register two URLs
- Magic link: remove the password entirely
- Lifting the email send limit with Resend
- When a login is not needed: nickname and PIN
- What to check after wiring it up
1. Which Method to Pick
The login screen that AI builds for you comes with an email field, a password field, and a sign-up button, all looking convincing. But you have to decide on a method before that screen can actually work. Which of the three you choose changes everything you build afterward.
Three questions decide it.
Flowchart: work down from the top, answering yes or no
- Question 1 Do you need to keep accounts long-term? No + little to lose if wrong → ends at Section 6, nickname and PIN
- Question 2 Is there an account provider that your users all have? Yes → Section 3, social login (Google, Kakao, etc.)
- Question 3 Are you willing to manage passwords? Yes → Section 2, sign-up / No → Section 4, magic link. Both require Section 5 first
3 questions, 4 destinations
Here are the pros and cons of the three methods in one table.
| Item | Permanent sign-up | Google login | Magic link |
|---|---|---|---|
| What the user does | Enter email and password | One click on a button | Enter email, click the link in the inbox |
| Password storage | Your service (Supabase) | None | |
| Needs email sending | Required (confirmation email is on by default) | Not needed | Required |
| Friction on return visits | Remembering the password | None | Going back to the inbox every time |
| Where it gets stuck | Confirmation email never arrives | People without that account | Lands in spam, blocked by company mail filters |
| What else you have to build | Reset emails, password rules | Registering a Google app, registering 2 URLs | Callback page, sending service |
| Best fit | Long-running services, internal tools | Users who already have Google accounts | When you already have an email list |
If the table is too narrow, try scrolling it sideways.
All three methods work with one tool, Supabase. The code below is all JavaScript that runs in the browser, and it works as-is as long as you have the project URL and the public key. I wrote up which key goes where in a post that organizes the key types.
2. Permanent Sign-Up: Email and Password
This is the most familiar method. It takes an email and password to create an account, and from then on, users log in with those two.
async function signUpNewUser() {
  const { data, error } = await supabase.auth.signUp({
    email: 'user@example.com',
    password: 'example-password',
    options: { emailRedirectTo: 'https://mysite/welcome' }
  })
}

async function signInWithEmail() {
  const { data, error } = await supabase.auth.signInWithPassword({
    email: 'user@example.com',
    password: 'example-password'
  })
}
Almost everyone who builds this for the first time gets stuck at the same point. Projects hosted on Supabase have email confirmation turned on by default. That means calling signUp doesn’t just create an account; it also sends a confirmation email, and the user has to click the link in that email to finish signing up. To turn it off, change the setting in the auth provider settings in the dashboard. Also, the address you put in emailRedirectTo must be registered in Supabase’s redirect allow list. If you don’t register it, users can click the confirmation link but won’t make it back to your site.
The path actually taken when confirmation email is on
- 1. User Enter email and password signUp call
- 2. Supabase Send confirmation email This is where you hit the send limit (Section 5)
- 3. User Click the link in the email Return to the emailRedirectTo address
- 4. Service Sign-up complete, session issued From here on, signInWithPassword works
Sign-up happens once, and the email round trip happens once
3. Google Login: Register Two URLs
Looking at the code alone, it’s the shortest of the three.
await supabase.auth.signInWithOAuth({ provider: 'google' })Most of the work happens outside the code. You register with Google that “my service is allowed to request logins,” and then you put the keys Google gives you into Supabase. The key point here is that you register two addresses, and they are different addresses.
What to register: 2 addresses and 1 key pair, each going in a different place
- Google Cloud Console Authorized redirect URI Value to enter: Supabase callback address (not your site's address)
- Supabase dashboard Google provider screen Value to enter: the client ID and secret Google gave you
- Supabase dashboard Redirect allow list Value to enter: your site's address
Google gets Supabase's address; Supabase gets your address
Here is what the actual screen looks like.
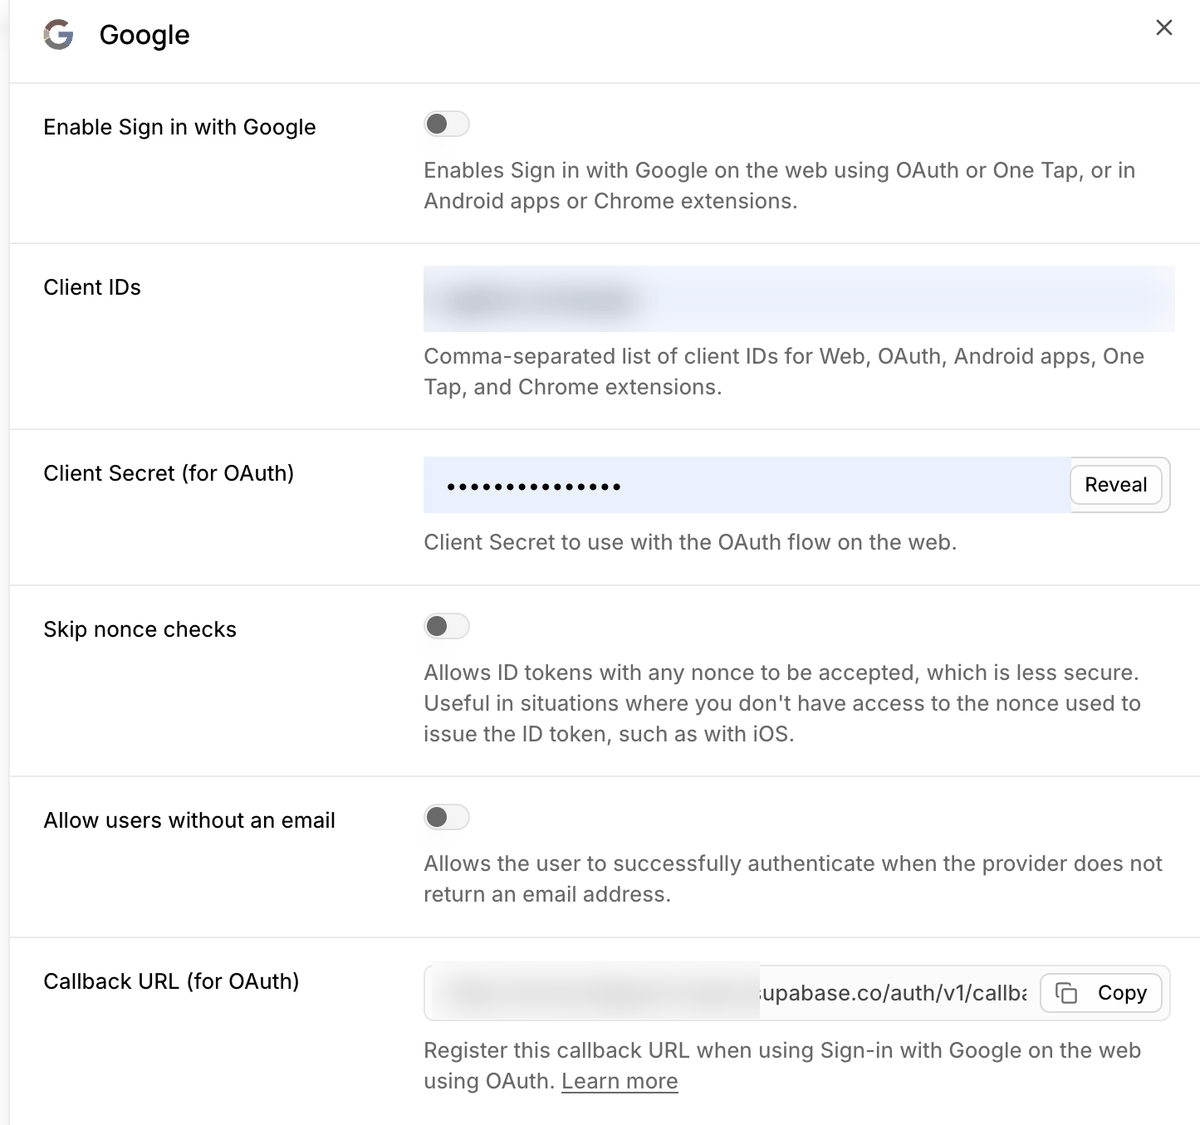
You don’t need to memorize the Supabase callback address. Press the copy button on the screen above and paste it on the Google side. Conversely, the address of your site where users are sent back after login has to be in Supabase’s redirect allow list, and the address you specify as redirectTo in the code also has to be on that list.
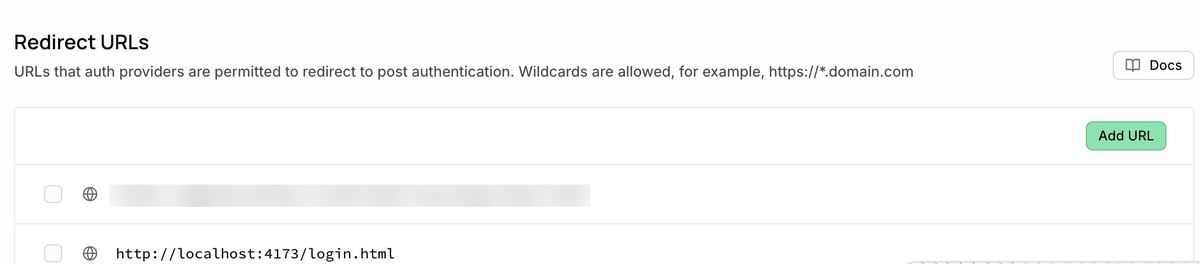
The place to enter your site’s address is elsewhere: the URL Configuration screen in Supabase.
4. Magic Link: Remove the Password Entirely
This method doesn’t create a password at all. It takes only an email, sends a one-time link, and when the user clicks that link, login is complete. Because no password is stored, there’s no password to leak and no reset screen is needed.
await supabase.auth.signInWithOtp({
  email: 'user@example.com',
  options: {
    emailRedirectTo: 'https://mysite/login',
    shouldCreateUser: false   // Do not create an account for an email that is not on the roster
  }
})
The function is named signInWithOtp, so it might look like a mistake, but it’s correct. The official docs note that the name is OTP but the default behavior is sending a magic link, and the two differ only in what the email contains.
The most important line in this code is shouldCreateUser. Its default is true, so if you enter any email at all, an account gets created first. The roster check in the diagram below only works after the account exists, so if your service runs on a roster, you need to set this option to false.
The path magic link login actually takes
- 1. User Enter email No password field
- 2. Supabase Send one-time link The default sender blocks you here (Section 5)
- 3. User Click the link in the inbox This drop-off point is the biggest friction
- 4. Callback page Receive session, check against the roster Signed out immediately if not on the roster
One line of code, four boxes to build
Step 4 is the one people skip. The address you put in emailRedirectTo needs code that receives the returning user and checks the session. Unlike sign-up, a magic link does this round trip every time the user logs in, so if this page is sloppy, the friction repeats every time.
5. Lifting the Email Send Limit with Resend
Two of the three methods depend on email. Sign-up has to send a confirmation email, and magic links have to send a login link. So for anyone who picked either of those, this section isn’t optional; it’s required.
The email sender that Supabase provides by default has two walls. You have to connect a separate sending provider to clear both. This connection is called custom SMTP, which means setting up your email to go out through a provider you choose.
| Wall | Details | Symptom |
|---|---|---|
| Recipient restriction | Sending is refused to addresses other than project team members | Email address not authorized error |
| Volume limit | 2 emails per hour | Used up after a few tests |
The first one blocks you first. When you test with your own account, it works because you’re a team member, but the moment you enter someone else’s email, sending is refused. The error message differs from the limit error, so if you only know about the “send limit,” you won’t find the cause.
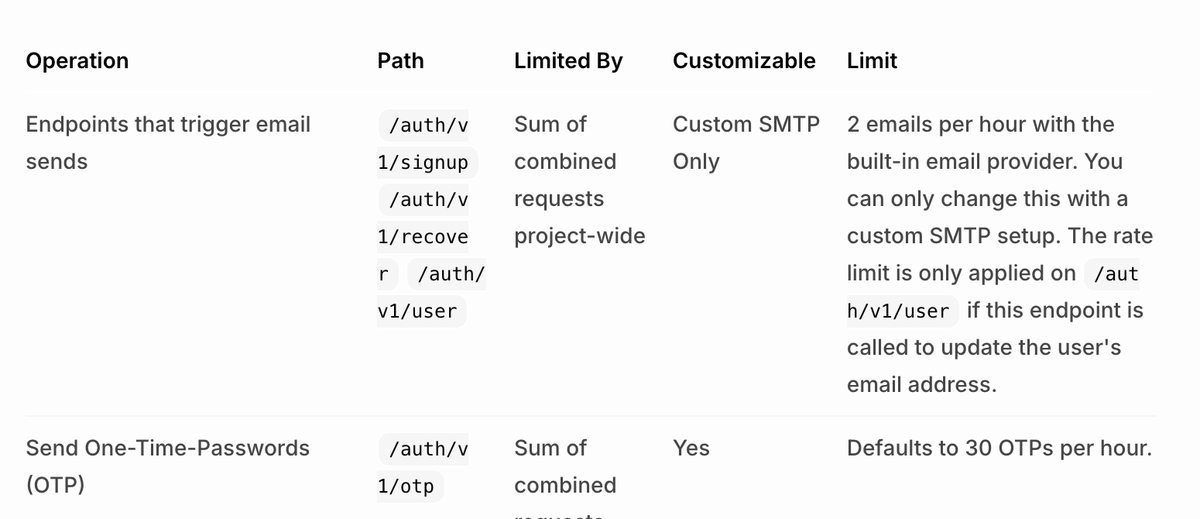
There is one place in the dashboard where you take down the walls.
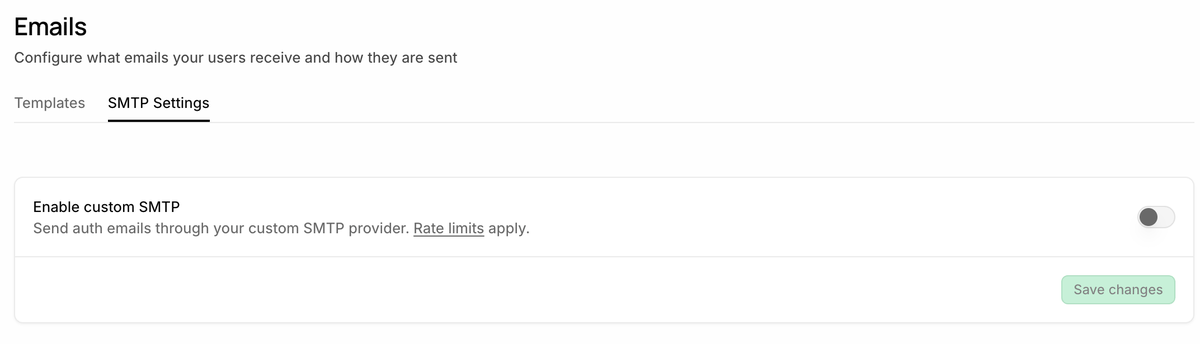
Supabase’s email setup documentation notes that the built-in sender as a whole is limited to 2 emails per hour, and it lists Resend, AWS SES, Postmark, SendGrid, and others as example providers. The same document states plainly that the default sender is not for production. Of these, the lightest for an individual to set up is Resend.
| Step | What to do |
|---|---|
| 1 | Sign up for Resend, add your domain |
| 2 | Designate a dedicated sending subdomain (e.g., send.yourdomain) |
| 3 | Add 3 verification records to your domain’s DNS |
| 4 | Confirm the records pass verification |
| 5 | Issue an API key with send-only permission |
| 6 | Enter those values in Supabase’s sending settings |
| 7 | Readjust the send limit (right after connecting, it’s set to 30 emails per hour) |
6. When a Login Is Not Needed: Nickname and PIN
By this point, you can see there’s quite a lot to build. So let me ask once more: does your service really need accounts?
An account does two things. One is figuring out “who is coming in right now,” and the other is handing back “that person’s things the next time.” If you only need the first, you don’t have to go as far as sign-up. When someone writes something, collect a nickname and a few digits together, and when they want to delete it, ask for those digits again.
This blog’s comments work that way. Right below this post, there are the same two fields.
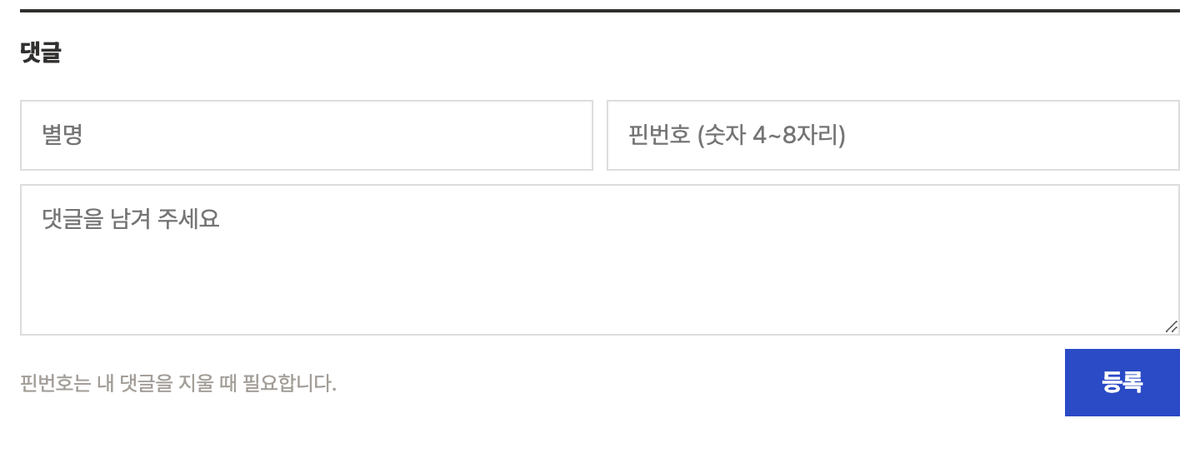
There is one thing to get right when you build this. You must not store the PIN as-is. Attach a random string (a salt), store only the hashed result, and when deleting, attach the same salt to the entered digits, hash it again, and check only whether the two values match. This way, someone who opens the stored data can’t read the numbers directly. But if the digit count is short, brute force gets through, so don’t treat this as a safety guarantee. Read it together with the pitfall below.
7. What to Check After Wiring It Up
Once login works, you’re halfway there. Check these four items before deployment.
| What to check | What happens if you skip it |
|---|---|
| Register the production address in the redirect allow list | Only the local address is there, so login doesn’t return after deployment |
| Run one real sign-up with someone else’s email | Testing only with team member addresses means you never see the send refusal |
| Confirm the send limit exceeds expected usage | On days when users flood in, emails don’t go out |
| Lock data per logged-in user | Other people’s data is visible as-is |
The last row is the one most often skipped. Login only answers “who is coming in right now,” and it doesn’t answer “how much of the data can that person see.” Even if the screen is open, if the data inside has to look different for each person, you have to set up locks separately on the database side.
Asking the question one more time before you build saves the most. Does this service really need accounts? I asked it late, and ended up deleting five functions.
Frequently asked questions
- Why does my Supabase sign-up succeed but the user still can't log in?
- Supabase turns on email confirmation by default. signUp sends a confirmation email, and login stays blocked until the user clicks the link. You can turn it off in the dashboard's auth provider settings.
- Which URL do I register with Google for Supabase social login?
- Register Supabase's callback address as the authorized redirect URI in Google Cloud Console. Register your site's address in Supabase's redirect allow list instead.
Want the full system? The Claude Code & Codex Skills guidebook collects the skills and subagents behind this blog, from $19.
BuildnWrite helps teams build AI agents that keep running. About BuildnWrite ›