Creating Your First GitHub Pages Site: From Sign-Up to Turning On Pages
Who this is forBeginners who want to publish a web page they built at a public internet address, and anyone waiting for a Pages site that still won't open after enabling it.
TL;DR: GitHub Pages is one of the free ways to publish a web page you made at an internet address. After three steps (sign up, create a repository, and turn on Pages), you have a Pages-ready state under your account. The screens make it look quick, but the site won’t open right after you click Save. This article walks through those three steps with real screenshots, and explains how to avoid mistaking that waiting moment for a failure.
Contents
- Three separate screens are easy to get lost in
- Step 1. Sign up
- Step 2. Create a repository
- Step 3. Turn on Pages in Settings
- When the address comes alive
- Where to look when you get stuck
- Once Pages is on, everything is visible
- If you get this far, you’re done
Three separate screens are easy to get lost in
Signing up on GitHub, creating a repository, and turning on Pages each happen on a different screen. Following them in order isn’t hard, but if you don’t know ahead of time what’s on each screen, you’ll get lost along the way.
This article walks through those three screens in order. No terminal commands appear anywhere. It’s a path you can complete entirely with mouse clicks.
Step 1. Sign up
Sign up with your email on github.com. The sign-up asks for two main things.
| What it asks | Why it matters |
|---|---|
| You use it to sign in every time | |
| Username (username) | It goes straight into part of your address later |
Your GitHub username goes straight into the default Pages address, which takes the form https://<username>.github.io/<repository-name>/. You can change it later, but doing so also changes every existing address that contains it. It’s better not to pick it too casually from the start.
Step 2. Create a repository
After signing in, create a new repository. Click the + button in the upper-right corner, or go directly to github.com/new.
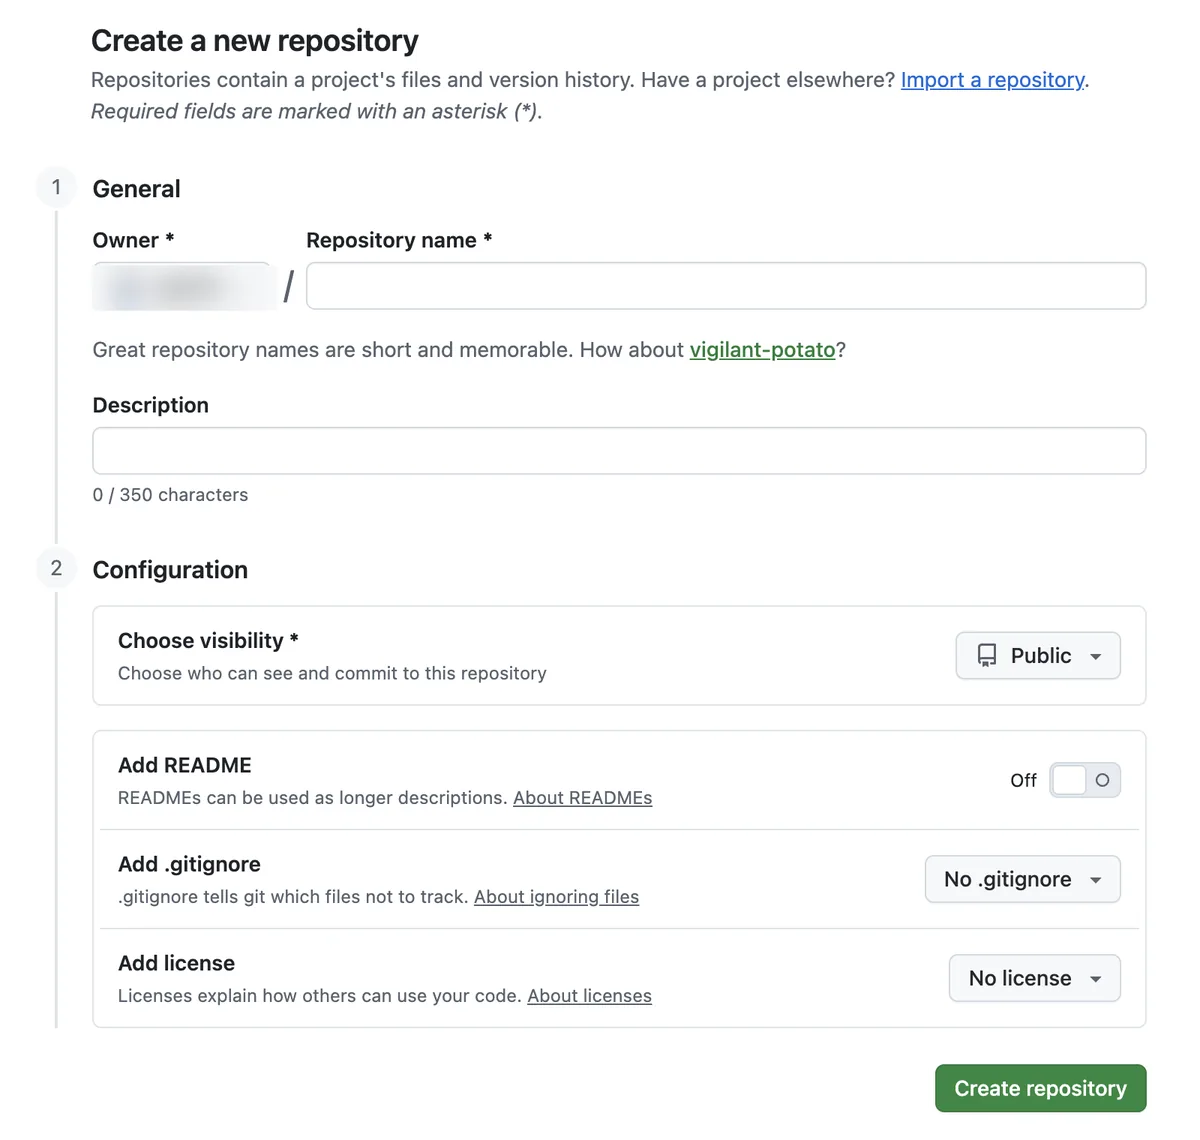
Here’s what to choose on this screen.
| Item | What to choose |
|---|---|
| Owner / Repository name | Leave Owner as your own account and name the repository however you like |
| Choose visibility | Public. On a free account, the repository must be Public to turn on Pages |
| Add README | Turn it on (On). The screen defaults to off, but you need it on so there’s a branch to select in Step 3 |
| Add .gitignore / Add license | You can skip these for now. Leave them as the screen shows (“No .gitignore”, “No license”) |
Click Create repository to make a repository with a README.
Step 3. Turn on Pages in Settings
On the repository page, click Settings in the top tab bar, then click Pages in the left sidebar.
The first time you open it, Pages is still off.
The two screens below were taken from different repositories. I picked one to show the state before turning Pages on and the other to show the state after. One more thing: the address on the after screen looks like http://challenge.buildnwrite.com/. That’s because this repository has a custom domain I bought connected to it separately.
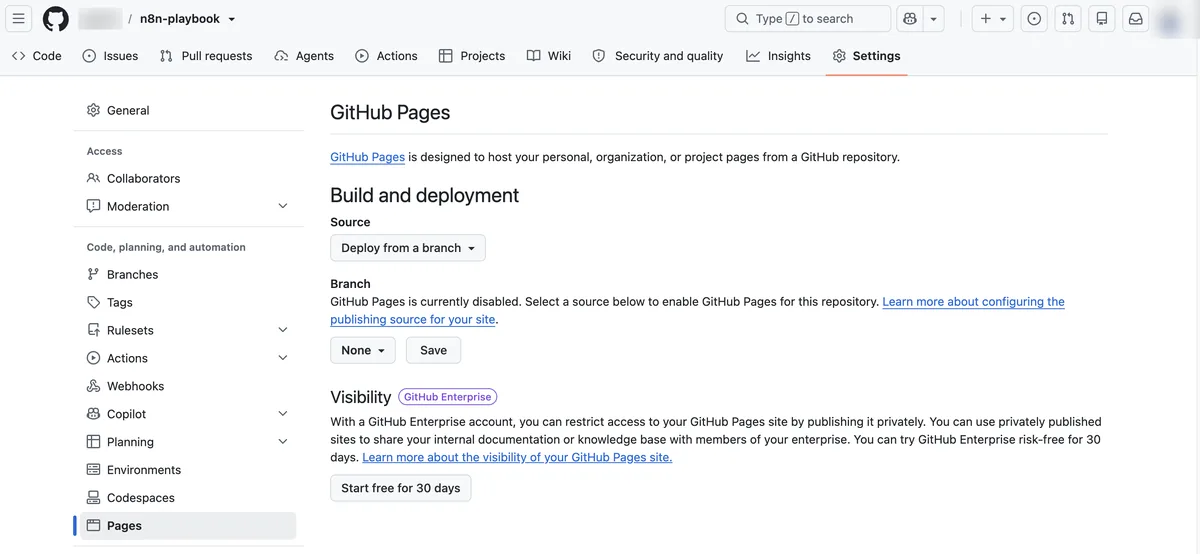
From the Branch dropdown, select the branch of the repository you just created (usually main), then click Save. After a short wait, the page changes to look similar to the one below. The next screen is the after state from a different repository, taken after I had already connected a custom domain.
When you first turn on Pages, you don’t get an address like the one above. You first get the default address, in the form https://<username>.github.io/<repository-name>/, with the username you chose in Step 1 placed directly in it. This is why I said not to pick your username too casually when you sign up.
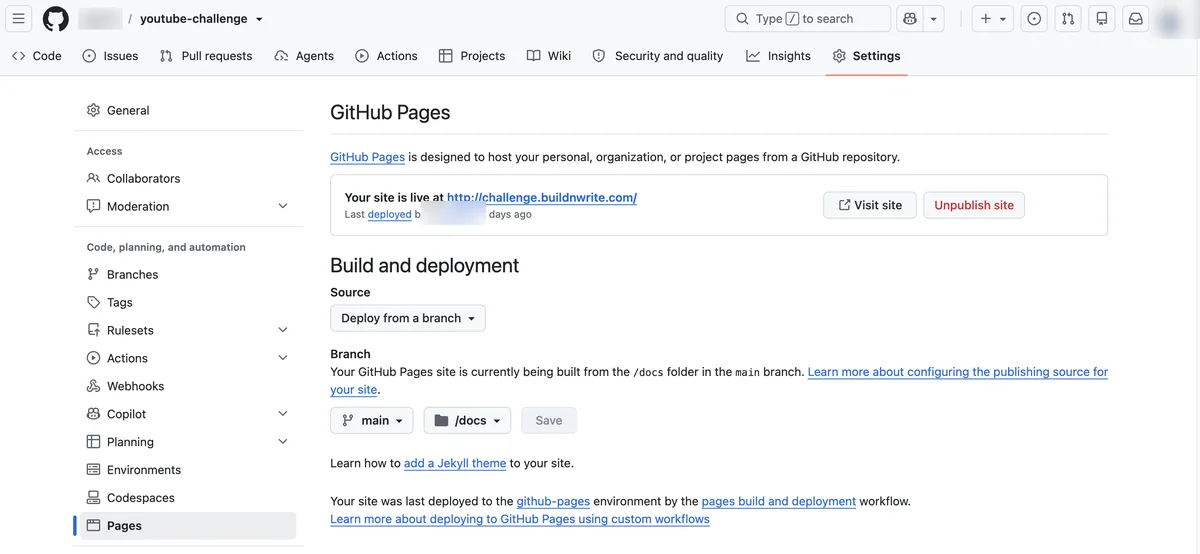
Here is what changes between the two screens, side by side.
| Item | Before turning on | After turning on |
|---|---|---|
| Top notice | GitHub Pages is currently disabled | Your site is live at (address) |
| Branch | None | main. This example also has the /docs folder and a custom domain connected. On a first-time setup, you usually start with the root (the outermost folder of the repository) and the default github.io address |
| Buttons | Only Save | Visit site and Unpublish site buttons |
When the address comes alive
Clicking Save doesn’t open the site right away. It’s easy to mistake this moment for something being wrong.
Right after saving, clicking Visit site may show a 404 (a notice that the requested page can’t be found). That’s because GitHub runs a build (a processing step that converts the files and places them) before publishing them to the live address. This takes a few minutes, usually between 1 and 5.
Where to look when you get stuck
So far I’ve been describing what happens when you already have an account and follow the steps in order. If you’re creating an account for the first time and working through Step 1 onward, you can get stuck in other places too. Here are three spots that often trip people up.
The Branch dropdown only offers None
You hit this if you skip turning on Add README in Step 2. If the repository has no files at all, there’s no branch to publish from. The before-state screen above is exactly this case, and the screen says: “GitHub Pages is currently disabled. Select a source below to enable GitHub Pages for this repository.” The fix is to go back to Step 2 and create at least one file. This is why the article told you to turn on README from the start.
I made it Private and Pages won’t turn on
If you leave Visibility set to Private in Step 2, a separate Visibility item appears under Branch on the Step 3 screen, with a GitHub Enterprise badge. The screen text says: “With a GitHub Enterprise account, you can restrict access to your GitHub Pages site by publishing it privately.” That means the feature isn’t available on a free account. To turn on Pages, you need to change the repository to Public. The next section covers exactly what gets published once it’s Public.
It’s still a 404 after several minutes
The previous section said to wait a few minutes. If you’re still getting a 404 after waiting longer than that, check Actions in the repository’s top tab bar. GitHub runs a deployment job every time you turn on Pages and keeps a record of it there. On a repository where Pages is actually on, the bottom of the Settings > Pages screen shows the text “Your site was last deployed to the github-pages environment by the pages build and deployment workflow” along with a link to that run record. In the Actions tab, you can open that run to see whether the deployment has finished or is still in progress.
Once Pages is on, everything is visible
The moment you turn on Pages, every file on that branch becomes public on the internet. It’s not just the repository page that’s published; it’s every file in the folder.
The Visibility item from the previous section says this directly. I said that keeping a Private repository private requires GitHub Enterprise. Put another way, on a free account the site goes public the moment you turn on Pages, whether the repository is Public or Private. GitHub’s official documentation says the same thing.
“GitHub Pages sites are publicly available on the internet, even if the repository for the site is private (if your plan or organization allows it).”
Here’s the summary.
| Repository visibility | When you turn on Pages (free account) |
|---|---|
| Public | It’s published |
| Private | It’s published just the same. Keeping it private requires GitHub Enterprise |
So check what’s in the folder before you turn it on. If it only contains practice files, that’s fine. But if you later adapt this for config files that hold API keys, data mixed with personal information, or internal company material, remove those files before turning on Pages.
If you get this far, you’re done
This article covers getting to the point where you can turn on Pages. It doesn’t cover the steps for uploading the files you made and displaying their contents on screen.
If you’re starting work where secrets must never end up in the site, read how to add GitHub Actions secrets first.
The screenshots in this article were checked on August 24, 2026. GitHub may change the screen layout and free-account policies. If your screen differs, follow the notice text in Settings > Pages.
Frequently asked questions
- Why does my GitHub Pages site show a 404 right after I click Save?
- GitHub runs a build before publishing, which usually takes 1 to 5 minutes. Wait a few minutes after clicking Save, then refresh the page.
- Why does the GitHub Pages Branch dropdown show only None?
- The repository has no files, so there is no branch to publish from. Turn on Add README when creating the repository so a branch exists to select.
Want the full system? The Claude Code & Codex Skills guidebook collects the skills and subagents behind this blog, from $19.
BuildnWrite helps teams build AI agents that keep running. About BuildnWrite ›